Crafting a Powerful Private Data Analytics Tool using ChatGPT and Streamlit
Imagine a world where you can effortlessly analyze DuckDB data and create an amazing Streamlit app with just a few lines of code. Well…

A Step-by-Step Tutorial to constructing a Natural Language Query-Based Analytics Tool
Crafted using Midjourney
Imagine effortlessly analyzing DuckDB data and creating stunning Streamlit apps with minimal code. It’s not just a dream, it’s reality! In this article, we’ll guide you through the magic of ChatGPT function calls and unlock DuckDB’s full potential. With ChatGPT’s function calls, SQL queries are generated on your command for tailored data analysis. It’s like having a data expert by your side. Want to customize functions? You have the power. While the article may be lengthy, it’s worth every read. Let’s dive in and witness the seamless synergy of ChatGPT and DuckDB unravel your data’s mysteries.
Picture this: with a simple function call, ChatGPT generates the SQL queries needed for data analysis, tailored to your specifications.
Setup
Before we jump into the thrilling world of data exploration, let’s make sure we have everything set up for our adventure. In your Python environment, we need to install a few essential libraries: openai, duckdb, and streamlit. Don’t worry, it’s a breeze! Just open up your terminal and run the following command:
git clone https://github.com/Sujeeth-Shetty/chatgpt-functions-streamlit-app.git
cd chatgpt-functions-streamlit-app
python -m venv venv
source ./venv/bin/activate
pip install -r requirements.txt
Awesome! Now we’re equipped with the tools we need to unleash the magic of ChatGPT and DuckDB for our data analysis journey.
Speaking of data, we have an exciting dataset to play with. Picture this: a fascinating dataset filled with one-way Expedia flights spanning from April 16, 2022, to October 5, 2022. The snappy-compressed Parquet file alone weighs in at a whopping 8.85GB! That’s a whole lot of data to dive into and explore.
Here’s a time-saving tip: if you don’t want to download the large dataset, you can directly use the itineraries.duckdbfile. It’s a quick way to get started without any hassle. Additionally, the Git repository for this project has all the necessary code to run on Streamlit Cloud. So, if you prefer to skip the code rebuilding process, you can head straight to the deploy section.
Load Data
To load your data into DuckDB seamlessly, all you need is the itineraries.ipynb notebook.
import duckdbcon = duckdb.connect(database='itineraries.duckdb')By default, DuckDB connects to an in-memory database, which means that any loaded data is flushed when the process ends. But here’s the exciting part: by providing the database parameter to the connect method, you can make your changes persist! This means that your data will be saved in two new files, namely itineraries.duckdb and itineraries.duckdb.wal.
load_query = """ CREATE OR REPLACE TABLE itineraries
 AS SELECT
 flightDate,
 startingAirport,
 destinationAirport,
 travelDuration,
 isBasicEconomy,
 isRefundable,
 isNonStop,
 baseFare,
 totalFare,
 seatsRemaining,
 segmentsAirlineName,
 segmentsArrivalTimeRaw,
 segmentsDepartureTimeRaw,
 segmentsCabinCode
 FROM 'itineraries_snappy.parquet'
 WHERE isNonStop
 limit 10000
"""
con.execute(load_query)
When we ran the query execution on my machine, it took around 5 seconds to load 10000 rows. By the way, the size of the itineraries.duckdb file is approximately 496 MB.
Now that we have a sense of the data size, let’s start building the app.
ChatGPT Helper Functions
First things first, create an app.py file and add the necessary helper functions. Here’s a handy tip: if you’ve stored your OpenAI API key in AWS Parameter Store, you can use this awesome helper function to effortlessly retrieve the key. However, don’t worry if you haven’t done that step yet – you can simply skip it and continue with the rest of the process.
GPT_MODEL = "gpt-3.5-turbo-0613"
def get_openai_api_key():
    # Connect to the AWS Systems Manager service
    ssm = boto3.client('ssm', aws_access_key_id=st.secrets["aws_access"],aws_secret_access_key = st.secrets["aws_secret"], region_name="us-east-1")
    # Retrieve the OpenAI API key from AWS Parameter Store
    response = ssm.get_parameter(
        Name='openAI_api_key',
        WithDecryption=True  # Set to False if the parameter value is not encrypted
    )
    # Extract the value of the parameter
    api_key = response['Parameter']['Value']

    return api_key
Now, let’s set the stage by defining a couple of handy utilities that will be our secret weapons throughout this journey. We’ll create tools for making seamless calls to the Chat Completions API and for efficiently managing our conversation state. These utilities will be our trusty companions as we dive deeper into the realm of ChatGPT and DuckDB.
#chatgpt utilities
@retry(wait=wait_random_exponential(min=1, max=40),
stop=stop_after_attempt(3))

def chat_completion_request(messages,
functions=None, function_call=None, model=GPT_MODEL):
    headers = {
        "Content-Type": "application/json",
        "Authorization": "Bearer " + openai.api_key,
    }
    json_data = {"model": model, "messages": messages}
    if functions is not None:
        json_data.update({"functions": functions})
    if function_call is not None:
        json_data.update({"function_call": function_call})
    try:
        response = requests.post(
            "https://api.openai.com/v1/chat/completions",
            headers=headers,
            json=json_data,
        )
        return response
    except Exception as e:
        print("Unable to generate ChatCompletion response")
        print(f"Exception: {e}")
        return e
def pretty_print_conversation(messages):
role_to_color = {
"system": "red",
"user": "green",
"assistant": "blue",
"function": "magenta",
}
formatted_messages = []
for message in messages:
if message["role"] == "system":
formatted_messages.append(f"system: {message['content']}\n")
elif message["role"] == "user":
formatted_messages.append(f"user: {message['content']}\n")
elif message["role"] == "assistant" and message.get("function_call"):
formatted_messages.append(f"assistant: {message['function_call']}\n")
elif message["role"] == "assistant" and not message.get("function_call"):
formatted_messages.append(f"assistant: {message['content']}\n")
elif message["role"] == "function":
formatted_messages.append(f"function ({message['name']}): {message['content']}\n")
for formatted_message in formatted_messages:
print(
colored(
formatted_message,
role_to_color[messages[formatted_messages.index(formatted_message)]["role"]],
)
)
return formatted_messageNow, let’s introduce some handy utility functions that will make extracting data from DuckDB a breeze.
def get_table_names(conn):
    """Return a list of column names."""
    table_names= []
    tables = conn.execute("SELECT table_name FROM
information_schema.tables")
    for table in tables.fetchall():
        table_names.append(table[0])
    return table_names
def get_column_names(conn, table_name):
"""Return a list of column names."""
column_names = []
columns = conn.execute("SELECT column_name from
information_schema.columns")
for column in columns.fetchall():
column_names.append(column[0])
return column_names
def get_database_info(conn):
"""Return a list of dicts containing the table name and
columns for each table in the database."""
table_dicts = []
for table_name in get_table_names(conn):
columns_names = get_column_names(conn, table_name)
table_dicts.append({"table_name": table_name, "column_names": \
columns_names})
return table_dictsNow, here’s the exciting part: you can leverage these utility functions to extract a representation of the database schema.
conn = duckdb.connect(database='itineraries.duckdb', read_only=True)
database_schema_dict = get_database_info(conn)
database_schema_string = "\n".join(
    [
        f"Table: {table['table_name']}\nColumns: {', '.join \
(table['column_names'])}"
        for table in database_schema_dict
    ]
)
In our quest to unleash the power of ChatGPT, we’ll dive into the realm of function specifications. Picture this: we’ll define a function specification, including the database schema, to guide the API in generating the perfect arguments for our desired function. It’s like giving the model a secret map to navigate through the data.
functions = [
    {
        "name": "ask_database",
        "description": "Use this function to answer user questions about flight itineraries. Output should be a fully formed SQL query.",
        "parameters": {
            "type": "object",
            "properties": {
                "query": {
                    "type": "string",
                    "description": f"""
                            SQL query extracting info to answer the user's question.
                            SQL should be written using this database schema:
                            {database_schema_string}
                            The query should be returned in plain text, not in JSON.
                            """,
                }
            },
            "required": ["query"],
        },
    }
]
Now, it’s time to put our plans into action and implement the function that will execute queries against the database.
def ask_database(conn, query):
    """Function to query duckdb database with a provided SQL query."""
    try:
        results = str(conn.execute(query).fetchall())
    except Exception as e:
        results = f"query failed with error: {e}"
    return results

def execute_function_call(message):
    if message["function_call"]["name"] == "ask_database":
        query = json.loads(message["function_call"]["arguments"])["query"]
        results = ask_database(conn, query)
    else:
        results = f"Error: function {message['function_call']['name']}
does not exist"
    return results
Build Streamlit App
Now, let’s talk about the Streamlit app we’ll be building. Our app is designed to make data analysis a breeze! We’ve set the page layout to be wide and added a catchy title for a captivating preview. Inside the app, you’ll find a convenient text editor where you can input your queries, and voila! The results will be displayed right on your screen. Keep in mind that the current output is not formatted perfectly yet, as our main goal was to showcase the implementation process. But don’t worry, we’ve got plans to enhance the app and make it even better.
messages = []
messages.append({"role": "system", "content": "Answer user questions
by generating SQL queries against the itineraries database."})
st.set_page_config(layout="wide")
st.title('')
st.subheader('Send a Message')
user_message = st.text_input(label="Input a Message")
messages.append({"role": "user", "content": user_message})
chat_response = chat_completion_request(messages, functions)
assistant_message = chat_response.json()["choices"][0]["message"]
messages.append(assistant_message)
if assistant_message.get("function_call"):
    results = execute_function_call(assistant_message)
    messages.append({"role": "function", \
"name": assistant_message["function_call"]["name"], "content": results})
st.write(pretty_print_conversation(messages))
To test the app locally, simply run the following command. If you encounter any exceptions, don’t worry! Just close or restart any kernel running DuckDB. Keep in mind that DuckDB supports either one read/write process or multiple read-only processes.
streamlit run app.pyDeploy The App
When it comes to storing data in DuckDB, we have a different approach. Instead of connecting to a remote database, we store the data in a DuckDB table directly. This means we can simply push the .duckdb file along with our app code to the repository. But here’s the catch: for files larger than 100 MB, we’ll need to utilize the Git Large File Storage extension. It’s a neat solution that allows us to manage large files seamlessly.
# initialize git
git init
# create repo on github.com and connect your local project to it
# connect your local project folder to your empty repo on github
git remote add origin https://github.com/Sujeeth-Shetty/chatgpt-functions-streamlit-app.git
# large file storage extension
git lfs install
git lfs track "*.duckdb"
git add .gitattributes
git status
git add .
git commit -m "Initial Commit"
git branch -M main
# go to your repo settings -> check on the checkbox "Include Git LFS objects in archives"
# then push changes to github
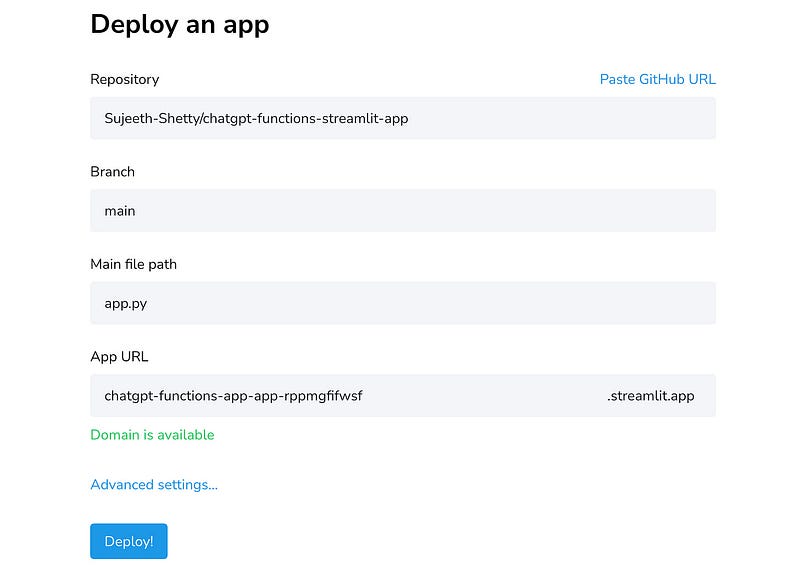
git push -u origin mainNow, let’s bring our Streamlit app to life! Head over to https://streamlit.io/cloud, sign in with your GitHub account, and click on “New App”. From there, select the repository you created earlier, choose the main branch, and specify the main file path as “app.py”. Once you’re all set, click on “Deploy” and watch the magic happen. If you’re using AWS Parameter Store to store your API Keys, don’t forget to provide the Access ID and Secret Key in the Advanced Settings.
Once you have all the requirements installed, your incredible app will come to life in just a matter of seconds. It’s that quick! So, buckle up and get ready to witness the magic unfold right before your eyes. Your data exploration journey is about to begin in the blink of an eye!
Keep in mind that the current output is not formatted perfectly yet, as our main goal was to showcase the implementation process. But don’t worry, we’ve got plans to enhance the app and make it even better.
Conclusion
We’ve witnessed the power of combining ChatGPT function calls, DuckDB, and Streamlit to revolutionize data analysis. Special thanks to Octavian Zarzu for his insightful article on implementing DuckDB and Streamlit. We’d also like to express our gratitude to the OpenAI Cookbook for their incredible resources that continue to inspire and empower developers like us. Together, we’ve explored the vast potential of data analysis and experienced the true magic of ChatGPT and DuckDB. Now, armed with this knowledge, go forth and unleash your creativity in the realm of data exploration.